

How To Run Influxdb On Windows
In the present world, technologies are updating solar day by day with enough of advanced facilities. Also, the installation of InfluxDB on windows tutorials also may differ some time to time. And then, here we have come up with a useful and handy tutorial on How To Install InfluxDB on Windows which is proficient and upwards-to-date amongst others.
These types of technologies may modify and grow all the time and then educational resources should adapt properly. The principal objective of offering this tutorial is to have an insightful and upwardly-to-engagement commodity on how to install it on Windows.
The tutorial of Install InfluxDB on Windows in 2021 covers the following stuff in a detailed mode:
- How do you install InfluxDB on Windows in 2021?
- How to download InfluxDB on Windows
- How to configure InfluxDB on your machine
- How to Run InfluxDB as a Windows service using NSSM Tool?
- Most Common Mistakes In The Process
Be gear up to follow all the required steps for a clean InfluxDB installation.
How practice you install InfluxDB on Windows in 2021?
Check out this video tutorial on how to install InfluxDB on windows and moreover, you lot tin can learn the basic commands of influxdb, and integration with Grafana from here:
How to download InfluxDB on Windows?
By following the beneath two methods, you can easily download the InfluxDB on windows:
a – Downloading the archive
Downloading InfluxDB is very straightforward.
Head over to the InfluxDB downloads page. There, y'all will see the following 4 boxes.
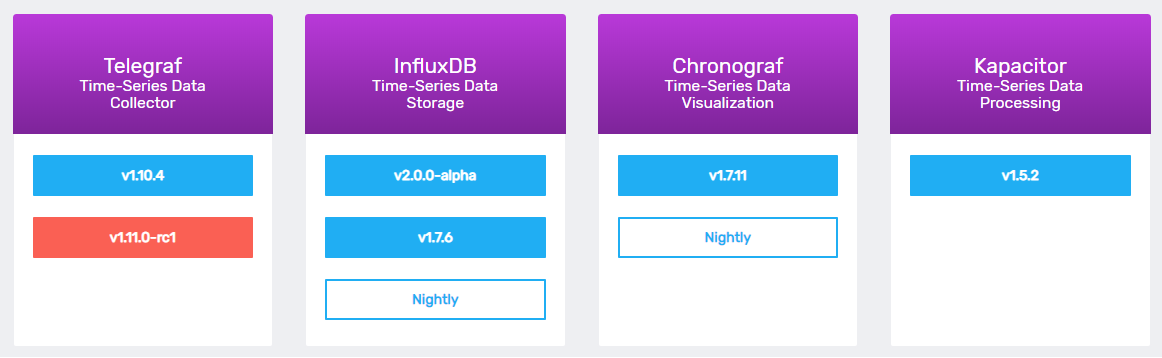
What are those iv boxes for?
They are function of theTICK stack. (Telegraf,InfluxDB,Chronograf, and Kapacitor).
Each of these tools has a very specific function: gathering metrics, storing data, visualizing time series or having post-processing divers functions on your data.
In this tutorial, we are going to focus onInfluxDB (the fourth dimension serial database component of TICK)
- How To Install InfluxDB ane.7 and two.0 on Linux in 2021
- How To Install InfluxDB Telegraf and Grafana on Docker
- How To Create a Database on InfluxDB 1.seven & ii.0
And then should you download the v1.7.six or v2.0.0 version?
In my previous manufactures, I answered the principal departure between the two versions, but here'sthe main departure you need to remember.
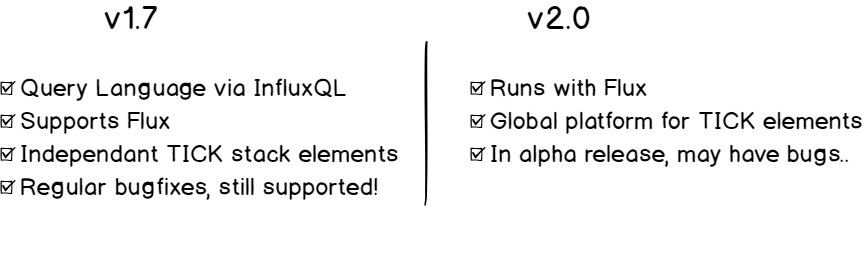
As the ii.0 version is even so experimental, we are going to go for the1.vii.6 version.
Click on the v1.7.six button.
Some other window volition open with all operating systems.Scroll until you see Windows Binaries (64-bit).

Justclick on the URL in the white box, and the download will automatically start in your browser.
Store it wherever you want, in my case, information technology will exist in the Program Files folder.
Unzip the archive using your favorite archive utility tool (7-Aught in my case) or run the following command in a Powershell command line.
Aggrandize-Archive -Force C:\path\to\archive.null C:\where\to\extract\to Great! Let's have a look at what you accept hither.
b – Inspecting the archive
Within your folder, you now have 5 binaries and 1 configuration file:
- influx.exe: a CLI used to execute IFQL commands and navigate into your databases.
- influx_inspect.exe: get some data about InfluxDB shards (in a multinode environment)
- influx_stress.exe: used to stress-test your InfluxDB database
- influx_tsm.exe: InfluxDB time-structured merge tree utility (not relevant here)
- influxd.exe: used to launch your InfluxDB server
- influxdb.conf: used to configure your InfluxDB instance.
Relevant binaries were marked in bold.
Also Check: How To Create a Grafana Dashboard? (UI + API methods)
How to configure InfluxDB Server on your Automobile
Before continuing, you have to configureyour InfluxDB instance for Windows.
We are substantially interested in 4 sections in the configuration file.
a – Meta department
This is where your raft database will exist stored. It stores metadata well-nigh your InfluxDB instance.
Create ameta binder in your InfluxDB directory (remember in my instance it was Programme Files).
Modify the post-obit section in the configuration file.
[meta] # Where the metadata/raft database is stored dir = "C:\\Program Files\\InfluxDB\\meta"
b – Data section
InfluxDB stores TSM and WAL files equally part of its internal storage. This is where your information is going to exist stored on your reckoner. Create adataand awalfolder in your binder. Again, alter the configuration file accordingly.
[data] # The directory where the TSM storage engine stores TSM files. dir = "C:\\Program Files\\InfluxDB\\data" # The directory where the TSM storage engine stores WAL files. wal-dir = "C:\\Program Files\\InfluxDB\\wal
Important: yous need to put double quotes in the path!
c – HTTP section
There are many ways to insert information into an InfluxDB database.
You tin use customer libraries to utilize in your Python, Coffee, or Javascript applications. Or y'all tin use the HTTP endpoint straight.
InfluxDB exposesan endpoint that one can use to interact with the database. It is onport 8086. (hither's the full reference of the HTTP API)
Back to your configuration file. Configure the HTTP department as follows:
[http] # Determines whether HTTP endpoint is enabled. enabled = true # The bind address used by the HTTP service. demark-address = ":8086" # Determines whether HTTP request logging is enabled. log-enabled = truthful
Feel free to change the port as long as it is not interfering with ports already used on your Windows machine or server.
d – Logging department
The logging department is used to decide which levels of the log will exist stored for your InfluxDB server. The parameter by default is "info", but feel gratuitous to change it if you want to be notified merely for"error" messages for example.
[logging] # Determines which log encoder to use for logs. Bachelor options # are car, logfmt, and json. auto will utilise a more user-friendly # output format if the output final is a TTY, but the format is non as # easily car-readable. When the output is a non-TTY, auto will use # logfmt. # format = "auto" # Determines which level of logs will be emitted. The bachelor levels # are fault, warn, info, and debug. Logs that are equal to or above the # specified level will be emitted. level = "error"
eastward – Quick exam
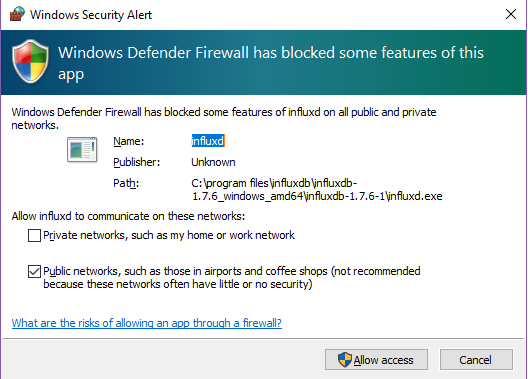
Before configuring InfluxDB every bit a service, permit'due south run a quick-dry test to see if everything is okay.
In a command-line, execute the influxd executable.Accept the firewall permission if you are prompted to do information technology.
At present that your InfluxDB server has started, start a new command-line utility and run the post-obit command.
C:\Users\Antoine>roll -sl -I http://localhost:8086/ping HTTP/1.1 204 No Content Content-Blazon: application/json Asking-Id: 7dacef6d-8c2f-11e9-8018-d8cb8aa356bb X-Influxdb-Build: OSS X-Influxdb-Version: ane.7.six X-Request-Id: 7dacef6d-8c2f-11e9-8018-d8cb8aa356bb Date: Tue, 11 Jun 2021 09:58:41 GMT The/ping endpoint is used to cheque if your server is running or non.
Are you lot getting a 204 No Content HTTP response?
Congratulations!
You now but have to run it as a service, and you will be all done.
How to Run InfluxDB as a Windows service using NSSM Tool?
As y'all guessed, yous are not going to run InfluxDB via the command line every fourth dimension you lot want to run it. That's not very practical.
You are going to run it as a service, using thevery pop NSSM tool on Windows.
You could use the SC tool that is natively available on Windows, but I just observe information technology more than complicated than NSSM.
To download NSSM, head over to https://nssm.cc/download.
Extract it in the binder that you want, for me, it will exist "C:\Plan Files\NSSM".
From there, in the current NSSM folder, run the post-obit control (you demand administrative rights to do it)
> nssm install
You lot will be prompted with the NSSM window.
Enter the post-obit details in information technology (don't forget the config section, otherwise our previous work is useless)
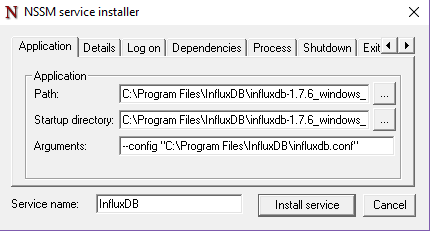
That's information technology!
Now your service is installed.
Head over to the services in Windows 10. Find your service under the name and verify that its status is "Running" (if you specified an automatic startup type in NSSM of course)
Is it running? Let'southward verify one more time with coil.
C:\Users\Antoine>gyre -sL -I http://localhost:8086/ping HTTP/1.i 204 No Content Content-Type: application/json Request-Id: ef473e13-8c38-11e9-8005-d8cb8aa356bb 10-Influxdb-Build: OSS X-Influxdb-Version: 1.7.six 10-Request-Id: ef473e13-8c38-11e9-8005-d8cb8aa356bb Date: Tue, 11 Jun 2021 11:06:17 GMT
Congratulations! You did information technology!
Y'all installed InfluxDB on Windows as a service, and information technology is running on port 8086.
Most Common Mistakes In The Process
The service did not respond in a timely style.
I encountered this error when I tried to set up InfluxDB as a service using SC. As many solutions exist on Google and on Youtube, I solved information technology past using NSSM.
Tried tweaking the Windows registry only it wasn't very useful at all.
Simply one usage of each socket address (protocol/network accost/port) is normally permitted.
Elementary, there is already a programme or service listening on 8086. You lot should alter the default port in the configuration file and accept i that is permitted and not used.
I don't have the same curl response
A 204 response to the coil command is the only sign that your InfluxDB is running correctly. If you lot don't get the same output, you should go back and double-cheque the steps before.
I have a parsing mistake in my configuration file!
Call up that in Windows systems backslashs have to exist escaped. It'southward double backslashs in the paths of your InfluxDB configuration file.
If your path contains some spaces, like "Program Files", make sure to put your path intoquotes.
Source: https://www.junosnotes.com/guide/how-to-install-influxdb-on-windows/
Posted by: danieloppoichest.blogspot.com
0 Response to "How To Run Influxdb On Windows"
Post a Comment